• Celiac Disease
  • Type 1 Diabetes
  • ABC of Couponing
  • Dysgraphia
  • Dyslexia

Journal of a Busy Mom

living one day at a time

  • Mom’s Corner
    • Reading Corner
    • Homemaking
    • Fitness
    • Family Life
    • Faithbuilding
    • Finances
  • Learning Challenges
    • LC Help 101
    • Dyslexia
    • Dysgraphia
    • ADD
  • Homeschooling
    • Schooling Fun
    • Planning & Organization
    • Homeschooling High School
    • Homeschooling & Beyond
    • Homeschooling Curriculum
    • Homeschooling w/Challenges
    • Homeschooling K-8
  • Gluten Free Living
  • SIBO/Low FODMAP
  • Life w/Autoimmune Diseases
    • Thyroid Disease
    • Diabetes
      • Our Story
      • Tips
    • Celiac Disease
      • Our Celiac Story

Planning My Homeschool Year: Year at a Glance

May 5, 2015 By Ligia

I am helping a friend of mine to plan out her homeschool year for next year. So, I have really had to stop and think about how I do it.

Well, I have to give credit where credit it due. For the last 2-3 years I have used The Ultimate Homeschool Planner by Debra Bell Published by Apologia Press. It has been a wonderful tool. Last year, however, as I started my daughter’s high school journey, I moved away from it and kind of  did my own thing.

But I have been using some resources from other moms. For example I used some worksheets from Edsnapshot’s Mini Planning kit. This year I went ahead and purchased the whole kit for under $15.

This particular calendar came from Tina at Dynamic Homeschool Plus:

Scan 15

2015-16 Calendar

Now, for step 1:

Gather all my schedules together: Husband’s holidays schedule, local school district schedule, our online “school” we like to use and any other schedules that might influence the school year (co-op, Community Bible Study,etc).

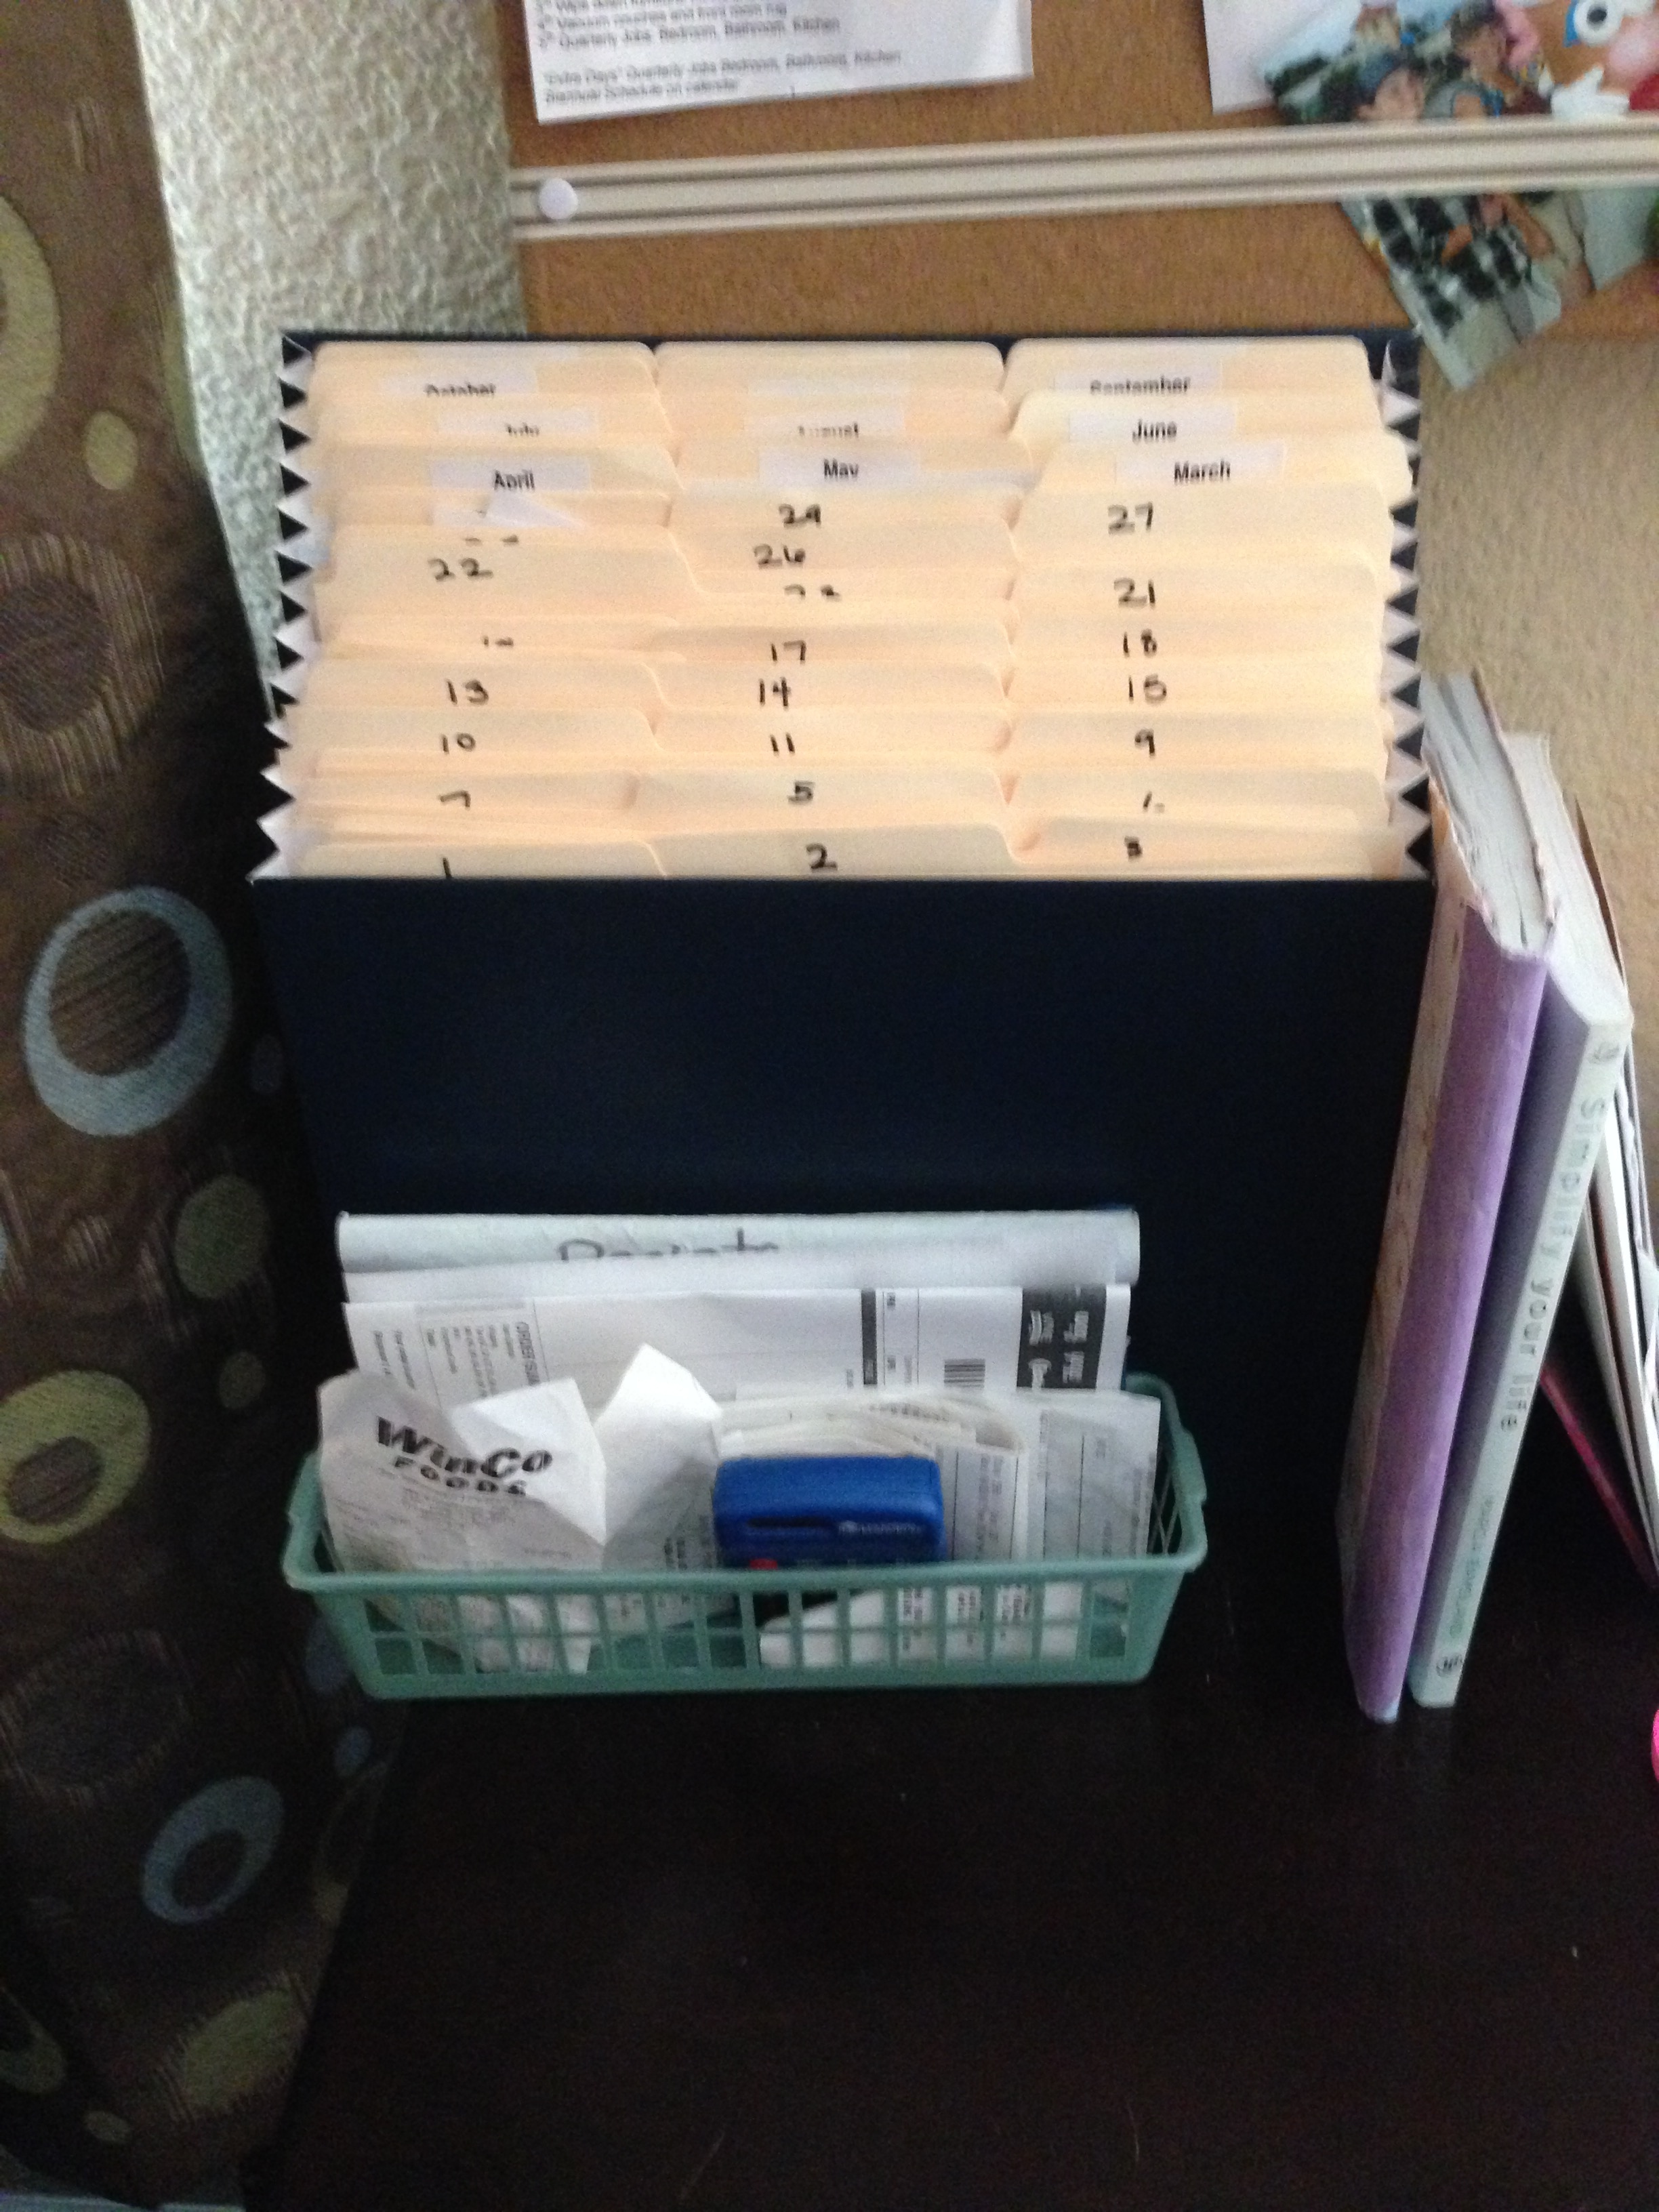
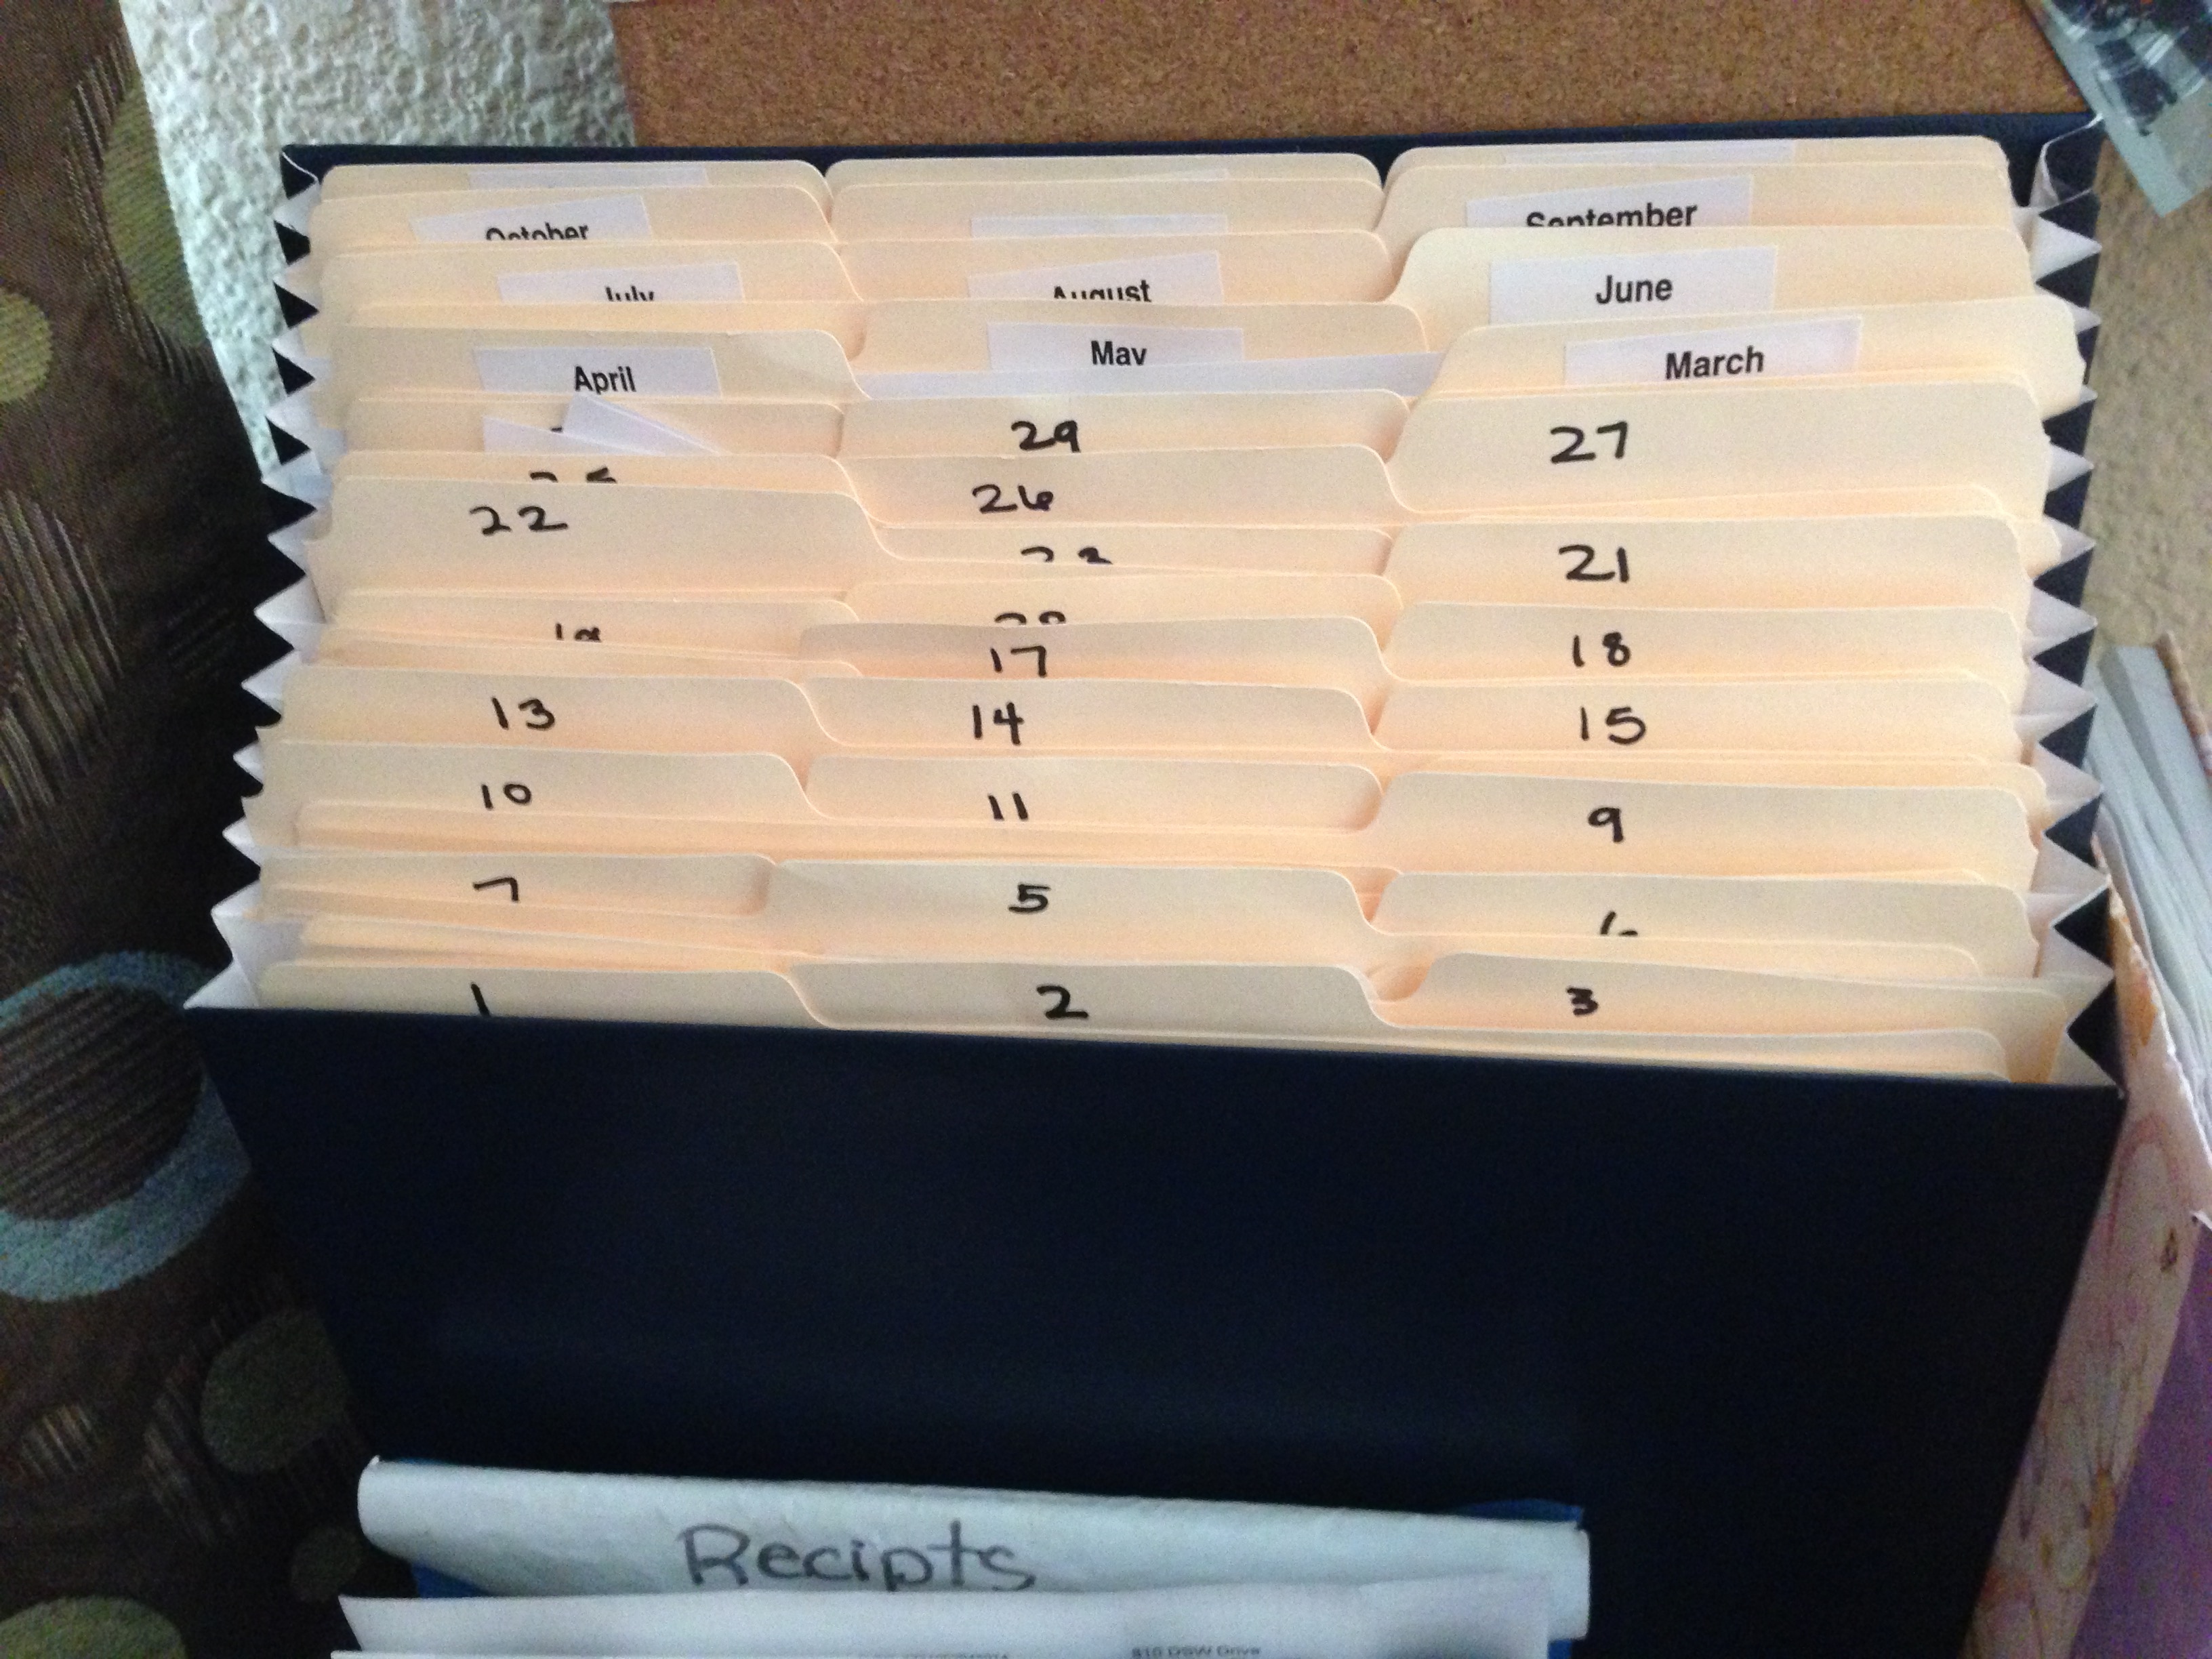
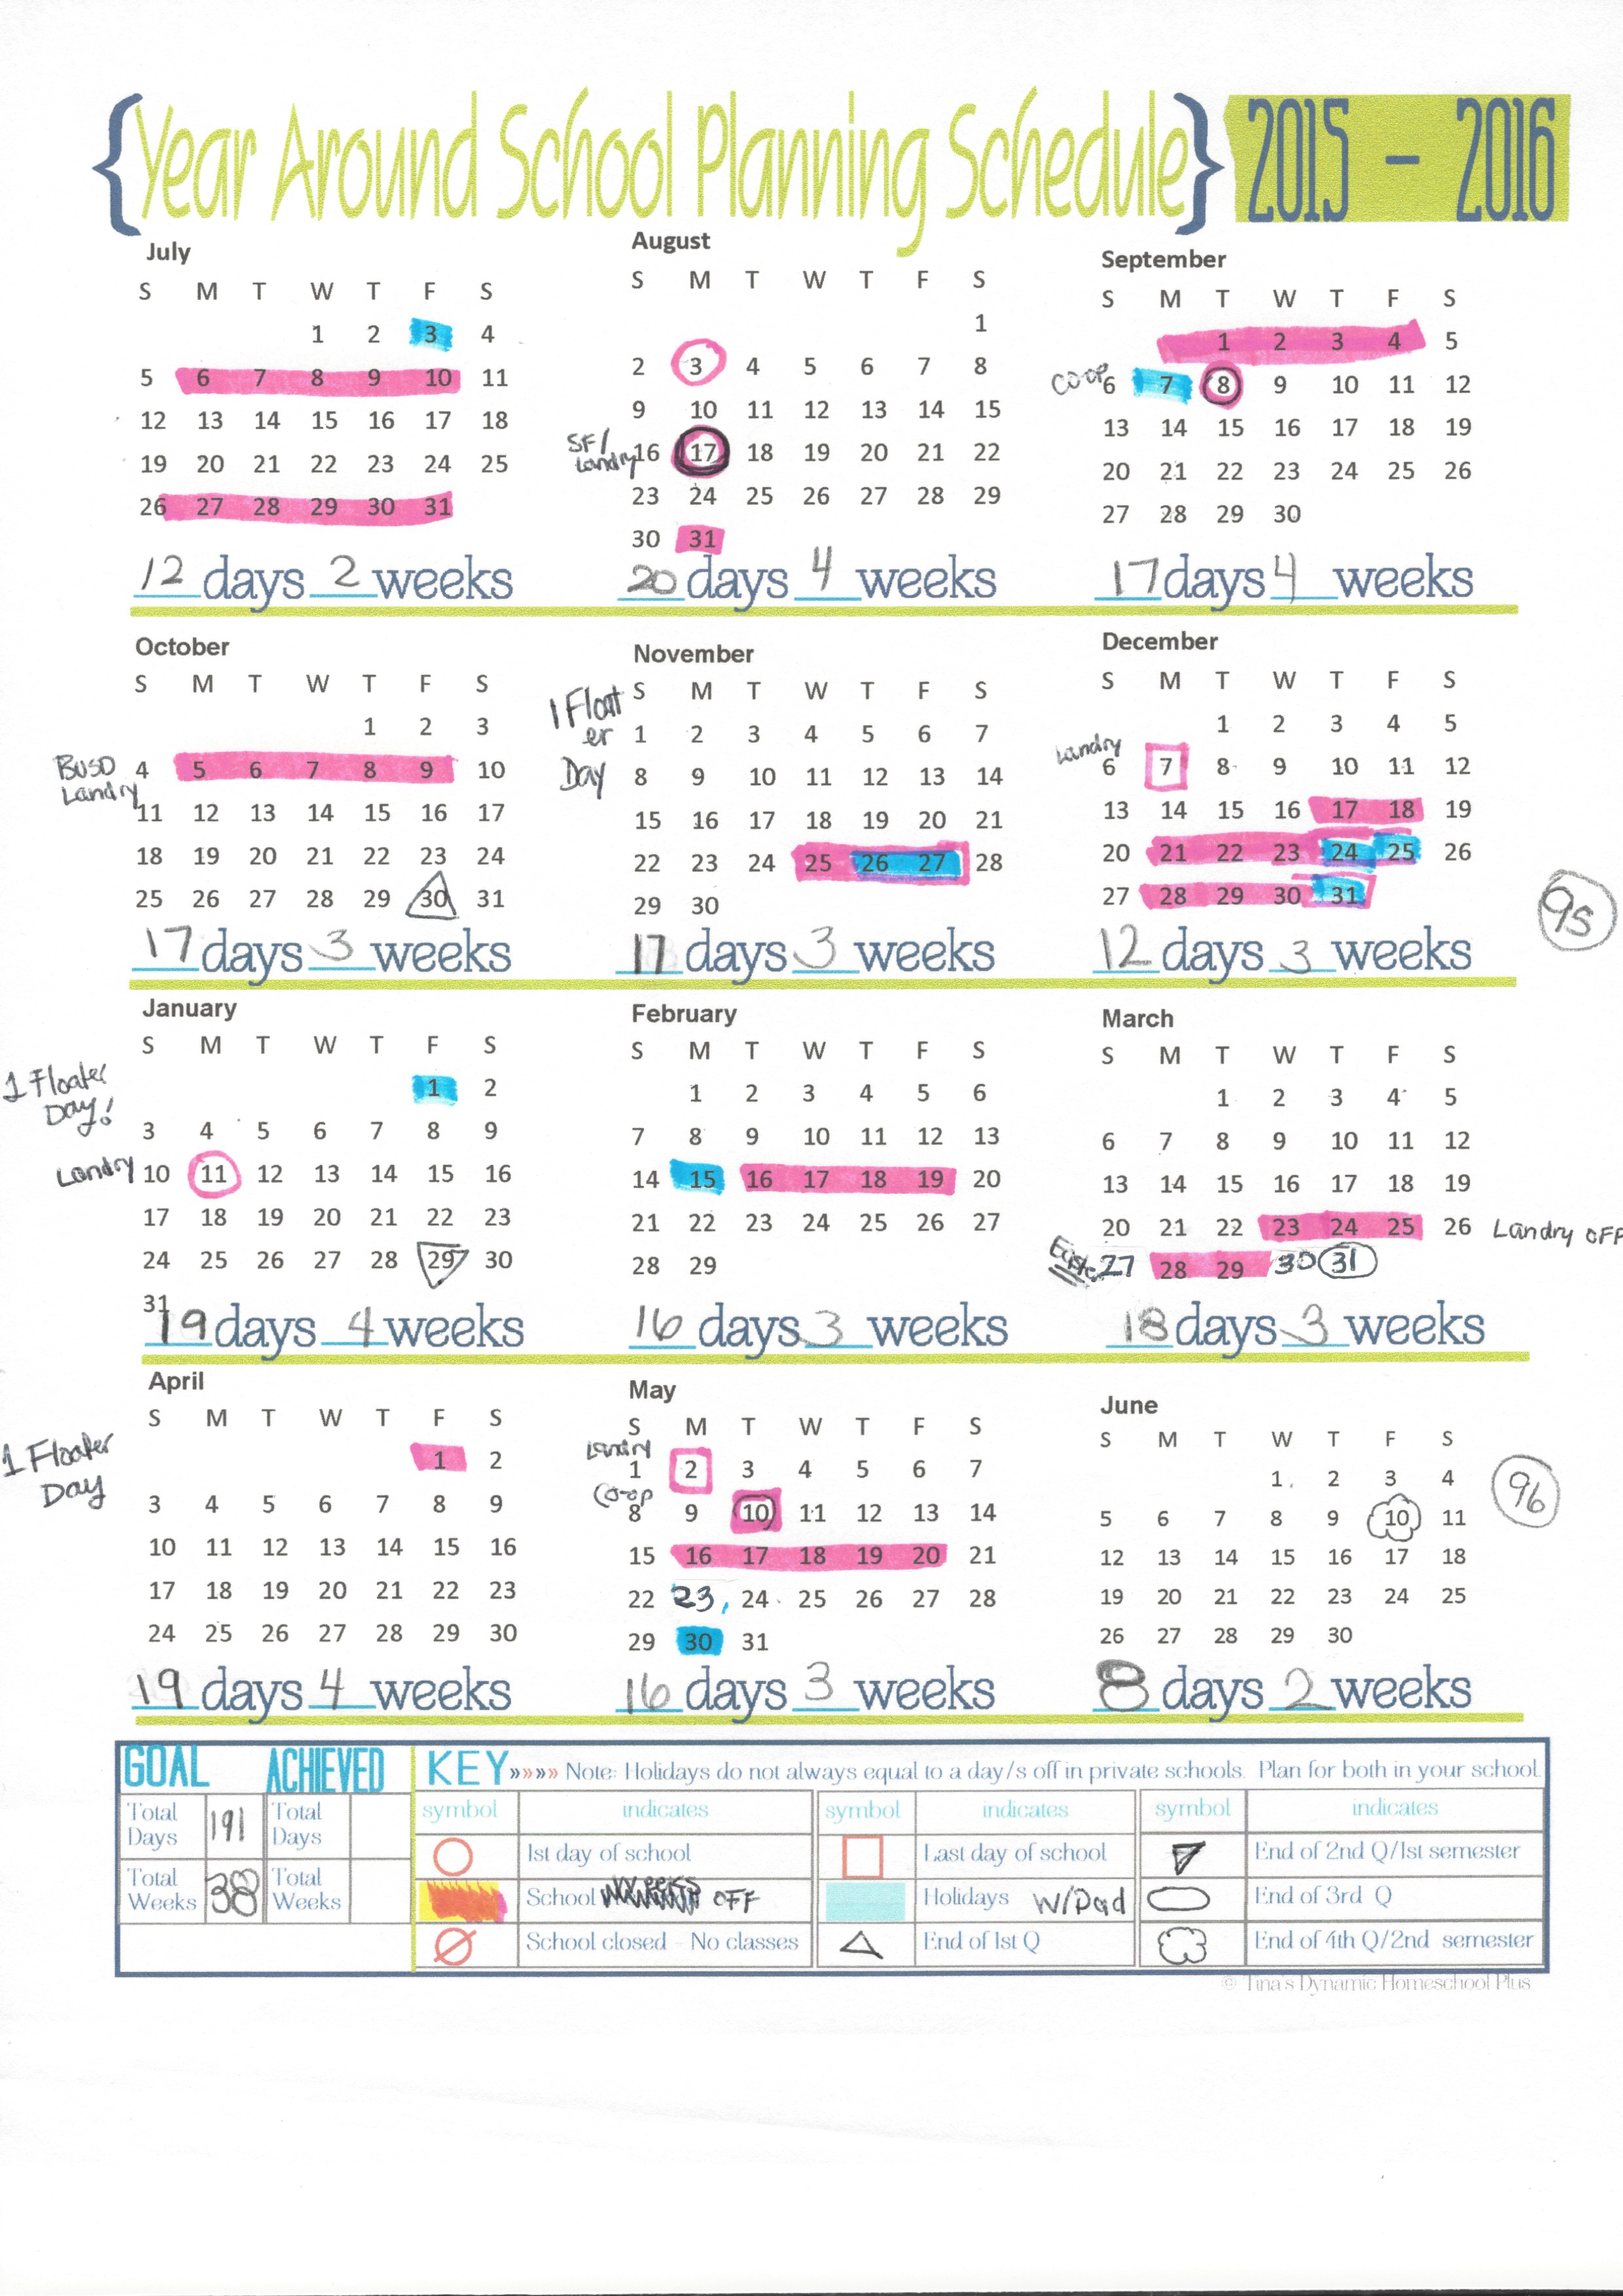
I also need a year at a glance calendar. I found a really neat one here. It is by far one of my favorites! I love how I can add up the days, weeks, and see everything on one sheet.

I start with marking off all the holidays that we will take off. Holidays are in blue. These are the days off that we will share with Dad.

Next, I  mark off the weeks we will take off. I do a modified year round schedule. So I don’t give the kids a “Summer” off. We take weeks throughout the year. Most of the year, we do school 5 weeks and take 1 week off. Sometimes, it doesn’t fit perfectly so it might be 6 or 4 weeks. I also have to consider what weeks our online “school” is taking off and sometimes I just do those weeks, even if it doesn’t perfectly line up. So our weeks off are in pink. Some weeks line up perfectly with when daddy is off so that is bonus.

Thanks to Tina at Dynamic Homeschool Plus, I have a handy 5 year Holiday List to use for this task.

So next, I go through and mark our semesters. We belong to a PSP(private satellite program) which is basically a private school. So, in our school we have semester end dates so we can turn in attendance quarter goals, etc. So those are marked in their various spots. For us they are October 31, January 31, March 31 and June 30. If these dates land on a weekend, I will chose the Friday before.

In California, we are required to complete 180 days of school so now I pencil it the numbers of days of school for each month. After adding up all the days, I have 191 days of school. I much rather have more days than not enough, so I am going to leave it alone.

I also have scheduled 3 floater days to take whenever we get overwhelmed. So even with those, I still have 191.

Obviously this calendar is not set in stone. Our 2014-15 calendar changed so much, I had to re-print it several times.

Ligia


Filed Under: Homeschooling, Planning & Organization

Getting Organized with a Tickler File

April 28, 2015 By Ligia

Have you heard of tickler file?
Well up until a few weeks ago, I had not either!
My chaotic “busy” life kept me from following the 52 Week Challenge sponsored by Home Storage Solutions 101.  So instead, I have picked and choosed what weeks and/or suggestions work for me.

The tickler file was part of the Mail Organization week on the Home Storage Solutions 101. Here is the full article:How & (Why ) to Create a Tickler File

So I really felt this organization system might work for me. Up until then, I used folders marked Acton Folder, Pending, etc. Unfortunately, I never got to the Action Folder and nothing ever got done (sad, but true). I really liked the idea of file things by day and having a daily “to do” folder.

So I followed her ideas, with a bit of tweaking, this is what I have:

IMG_4622 IMG_4621

My tickler file is very different. I do not move the folders. I pull out the folder and look inside. I take out what is in the folder. If I am unable to get to it, I move it to the next folder. As I get things in the mail for future dates,  I file it in the corresponding month folders. When May comes, for example, I will empty out May into the individual day files.

Here is another article on the Tickler File:

Back to the Basics: The tickler file

I am excited to use this to help me be more organized!

Ligia

Filed Under: Homemaking

Gluten Free Lemon Drop Cake

April 16, 2015 By Ligia

This post is dedicated to the Safeway cashier who asked me if I was making a Lemon drop cake since I was buying a cake mix and lemons. Well….I had to go find out what that was. So here I am posting about my first Gluten Free Drop Cake.

I found it on this amazing post: Lemon Drop Cake Plus A Little Frosting Secret.

There is no Lemon Cake Mix for Gluten Free peeps so I used Safeway’s Eating Right Gluten Free Cake Mix. I did find the Lemon Frosting so that is good. If I had not, I might have tried using lemon juice and mixing it into a vanilla frosting.

IMG_4560

So it was fun to make this cake. I loved the frosting secret. (Please see the original post for that secret).

IMG_4561

1 box Cake Mix
1 Tub Lemon Frosting
3 eggs
1/2 c. vegetable oil ( I use coconut oil)
1 1/4 c. water
2 lemons
1 c. Powdered Sugar

Preheat oven to 350 degrees.

Make the cake as directed on the box.

Pour into your greased pan. I used a round cake but you can do a 9×13. Unfortunately, I think the GF cake mix makes a smaller cake than the regular cake mix, so if you make a 9×13 it will be flat.

Now, while the cake is baking, take your fresh lemon, and squeeze enough juice to make 1/4 cup.   Mix it with the powdered sugar. This is what it will look like after.


IMG_4556

When the cake is done, let it sit on the counter for 15 minutes. With a fork, poke holes all over the cake.

Take the glaze and pour it over the cake. Then refrigerate for 2 hours. (I did mine overnight)

When the time is up, it is now time to make the frosting. To make it easier to frost, pop the whole can, minus the lid and foil, into the microwave for 20 sec. It makes it easier to frost and you can actually swirl it around. (this is a tip from the original author!) If you microwave the rest of what is left for a little longer (10-15 sec) you can “drizzle” it on the cake.IMG_4565

Yummy AND easy.

I am sharing this recipe on Gluten Free Wednesdays.
Ligia

Filed Under: Gluten Free Living, Homemaking

  • « Previous Page
  • 1
  • …
  • 26
  • 27
  • 28
  • 29
  • 30
  • …
  • 107
  • Next Page »

About me

Welcome to my blog! I'm a homeschool mom of two kiddos. I'd love to share what I 've learned and continue to learn as a busy mom trying to do it all!

Categories

Archives

Goodreads: Book reviews, recommendations, and discussion
Homeschool Buyers Co-op
Homeschooling's
#1 Way to Save

No content on this website may be used without my permission.